Showing posts with label tips and Tricks. Show all posts

Wednesday, January 30, 2013

Hacking/Cracking a WPA/WEP encrypted WIFI network - Find WIFI Password Using Fern WIFI Cracker

I am going to discuss the use of a tool named as FERN WIFI CRACKER using which in general you can hack WEP as well as WPA secured WIFI networks and this GUI based application is quite easy to use plus, it cracks password in quite fast time if you have a good computer with fast RAM and processor. In backtrack 5 its already installed an is properly configured but you can get it on Ubuntu and other Linux flavours also. Read this post to learn how to setup FERN for Ubuntu.Setting Up and Running Fern WIFI Cracker In Ubuntu What this application uses has been listed in the post. After installing Fern in any linux or else you can also use backtrack 5 for this purpose. Read here how to install backtrack 5 :- and Install Backtrack 5 as dual boot (Windows and Bt5 Together). Whatever OS you are going to use just run Fern and read below.
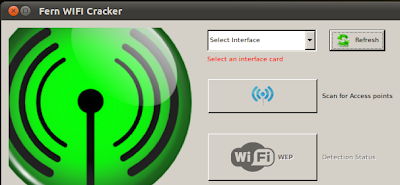
Using Fern Wifi Cracker:-

Click the refresh button to load monitor interfaces. Then hit scan button, its for dual functioning mean, at first hit it will start scanning and again if you hit it it will stop scanning.
Fern Wifi Cracker
When any WIFI network with WEP and WPA will be found by FERN it will be displayed as in this below screen shot. You have to hit button of WPA or else WEP inorder to crack the password for any of the WIFI network.
WEP and WPA scan FERN

Cracking WEP encryption based WIFI password key:-

After hitting the activation button of the WEP attack. What happens can be seen in screen shots below:-
So, key has been successfully recovered.

Cracking WPA encryption based WIFI password key:-

Cracking WPA encryption based WIFI password
So, key has been successfully recovered, as you can see.

Where the keys database can be found later?

All the keys which are recovered are automatically saved here:- /usr/local/bin/Fern-Wifi-Cracker/key-Database/Database.db. Plus you can also add keys manually.
Fern Key database

Tracking provider of WIFI Router's location using Mac Address:-

Here is the geographical location mac addres tracker. You can run it from :- ToolBox>Geolocatory Tracker
Fern Mac Tracer

Thursday, September 20, 2012

How to Change Windows 7 Boot Screen

Changing boot screen of Windows 7 is not an easy thing, if you try it manually, you need to edit 5-6 system files to do the task and often that may lead to operating systems instability. With Windows 7 Boot Updater its not a problem anymore. This program can edit each and every object in Windows 7 boot screen, you can change the boot animation with any animated image(support to  image formats such as BMP, PNG, GIF or TIFF), you can change the texts written on the boot screen to anything you like and even the background color to your choice.


You can download Windows 7 Boot Updater from here or through this direct link. The program is compatible with both 32-bit and 64-bit systems, but you may find some bugs in the program as its still in beta phase, so it is highly recommended to backup your system before using this.

bootsc1


Features
  • Modifies the boot animation, colors, text and background.
  • Modifies the resume from hibernation screen as well.
  • Will create the animation from 105 BMP, PNG, GIF or TIFF images or use a single (non-animated) image.
  • Does not require any other applications (like ImageX).
  • Designed to be idiot-proof by having numerous checks.
  • Automatically backs-up the modified files.
  • Does not require test-signing or no-integrity-checks to be enabled.
  • Works for all versions of Windows 7: any language, any edition, 32-bit or 64-bit, RTM or SP1.
  • Available in English, German, Spanish, Russian, Italian, French, Dutch, Hungarian, Hebrew, and Vietnamese.
  • Works even if your setup has the hidden "System Reserved" partition.
  • Can be run as a GUI, command-line program, or installer/uninstaller.
You can get boot screens by searching Google and many artists/designers have uploaded their creations on Deviantart, you just have to search like this.
Please like and share if this was helpful. Subscribe to stay updated.

Change Text On Start Button


Step 1 – Modify Explorer.exe File
In order to make the changes, the file explorer.exe located at C:\Windows needs to be edited. Since explorer.exe is a binary file it requires a special editor. For purposes of this article I have used Resource Hacker. Resource HackerTM is a freeware utility to view, modify, rename, add, delete and extract resources in 32bit Windows executables and resource files (*.res). It incorporates an internal resource script compiler and decompiler and works on Win95, Win98, WinME, WinNT, Win2000 and WinXP operating systems. Navigate here to download Resource Hacker.
The first step is to make a backup copy of the file explorer.exe located at C:\Windows\explorer. Place it in a folder somewhere on your hard drive where it will be safe. Start Resource Hacker and open explorer.exe located at C:\Windows\explorer.exe as shown in Fig. 01.

Fig. 01
The category we are going to be using is String Table. Expand it by clicking the plus sign then navigate down to and expand string 37 followed by highlighting 1033. If you are using the Classic Layout rather than the XP Layout, use number 38. The right hand pane will display the stringtable as shown in Fig. 02. We’re going to modify item 578, currently showing the word “start” just as it displays on the current Start button.

Fig. 02
There is no magic here. Just double click on the word “start” so that it’s highlighted, making sure the quotation marks are not part of the highlight. They need to remain in place, surrounding the new text that you’ll type. Go ahead and type your new entry. In my case I used ElderGeek as shown in Fig. 03.

Fig. 03
Compare the screen captures in Fig. 02 and Fig. 03 and you’ll notice that after the new text string has been entered the Compile Script button that was grayed out in Fig. 02 is now active in Fig. 03. I won’t get into what’s involved in compiling a script, but suffice it to say it’s going to make this exercise worthwhile. Click Compile Script and then save the altered file using the Save As command on the File Menu. Do not use the Save command – Make sure to use the Save As command and choose a name for the file. See Fig. 04. Save the newly named file to C:\Windows.

Fig. 04
 Step 2 – Modify the Registry
Now that the modified explorer.exe has been created it’s necessary to modify the registry so the file will be recognized when the user logs on to the system. If you don’t know how to access the registry I’m not sure this article is for you, but just in case it’s a temporary memory lapse, go to Start (soon to be something else) Run and type regedit in the Open: field. Navigate to:
 HKEY_LOCAL_MACHINE\ SOFTWARE\ Microsoft\ Windows NT\ CurrentVersion\ Winlogon
 
Fig. 05
In the right pane (Fig. 05), double click the Shell entry to open the Edit String dialog box as shown in Fig. 06. In Value data: line, enter the name that was used to save the modified explorer.exe file. Click OK.

Fig. 06
Close Registry Editor and either log off the system and log back in, or reboot the entire system if that’s your preference. If all went as planned you should see your new Start button with the revised text.

Sunday, September 16, 2012

Hack Pentium 4 To Make Core2Dual Processor


Note, this trick is really not recommended as this may cause windows to provide falsified information to it self and other applications, which would cause system stability issue and may slow down the system…. How to Change the Processor Name shown in the System properties Dialog Box ??
Under Windows XP, Click Start, then RUN Command, ―regedit―… (Without the quote symbols)… Now please navigate your self to this Registry location, >HKEY_LOCAL_MACHINE > HARDWARE > DESCRIPTION > SYSTEM > CENTRAL PROCESSOR > GO TO 0 Now please double click, on the key PROCESSORNAMESTRING . 
Change the value as you like…59
Here you can see I changed my processor to 8.0GHz. So go and showoff to your friends that you have 8Ghz processor ...
lol!!!!